Are you a craft freak loving to do hobby electronics? In this DIY project we are introducing you to the world of ‘paper circuits’. As the name suggests it has some circuits which are functional and the main best part is that they are created on paper. Before moving to a paper circuits experiment let us peep into the world of paper circuits.
As said earlier these circuits are created on paper rather than on PCB thus eliminating the need of soldering, wiring etc. First the circuit layout is printed or drawn on the paper. The connections are made by copper tapes, paints and inks instead of wires. Copper tape is an easier way. Peel it and stick on the circuit diagram. To fix electronic components, make a gap between the copper tapes. So it provides strong connections between electronic components and traces.
Now we will go through the different main components required to make a fully functional paper circuit. First for making conductive traces; conductive ink, conductive paint or copper tapes are used. The conductive ink or conductive paint can be bought from circuit scribe, AgIC .
It uses brush or squeeze bottle to draw traces. It can also used as glue components to the traces. Its main problem is that it requires time for dry. It needs practice to do the perfect works and also needs patience too. It may be difficult to the beginners to create complex traces. The cost is varied. Its main advantages are used like a water paint, other paint can used to cover this conductive paint after drying, etc. Its disadvantages are it will not conduct until dried fully, (Dry time depends on thickness of painting and type of paint), needs practice to get finite traces. Short life span for copper based paint (it will oxidize quickly), cracking occurs under strain etc.

Note: Draw the trace on the paper using pencil or marker before painting. Glue down the components. Carefully apply the paint on the traces using brush or squeeze bottle. Test only the paper circuits after the paints dry.
It is easier because conductive inks are now available in prefilled pens. Using conductive ink, it is used to simply draw to create the traces. The conductive ink will dry as fast as conductive paint. It is the easiest method but attaching components is a difficult process. It is difficult for beginners to connect the components to ink. The main advantages of conductive ink are it will dry faster than conductive paints, it create precise lines, intuitive use etc. Its disadvantages are difficult to attach the components; ink will not adhere to some papers etc.
Note: Carefully draw the traces using conductive inks. Gaps are provided to connect the electronic components. To attach the components on the top of ink traces, tape or conductive glue can be used.
They are in two forms such as conductive adhesive and non conductive adhesive. Copper tape with non conductive adhesive is seen in common.
Conductive adhesive tape is used as interconnections in paper circuit. It conducts electricity on both top and bottom, so it can be used to make electrical connections in paper circuit. Non conductive adhesive tape is only conductive at top. To create electrical connections, two tapes are taping together. Copper tape has its own advantages and disadvantages. It does not require any dry time. It allows soldering. It is locally available in all hardware stores. The main disadvantages of copper tapes are careful to cut the copper tape according to the template, conductive fabric tapes are expensive etc. The paint and ink cannot solder. The conductive tape for paper circuit is made up of thin sheets of copper. It has an adhesive at the bottom. Conductive fabric tape is made up of nickel, copper, cobalt.
Next we will see the different components used in the paper circuit. The components here listed are those which are generally used. Depending upon the application and purpose the complexity and components will vary.
The different tools used to make or complete the functional paper circuits.
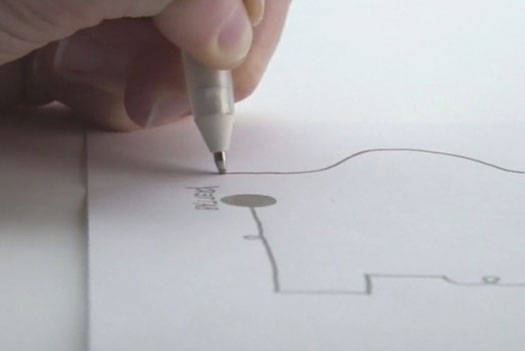
Let’s start with a simple DIY experiment glowing LED.
Create the circuit layout for glowing LED.
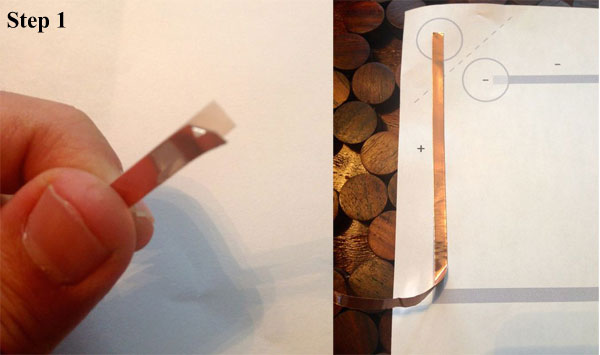
Stick the copper foil tape on the traces. Start from any of the circle battery locations. The copper foil tape has a white backing paper. First separate the white backing paper from the copper foil tape.
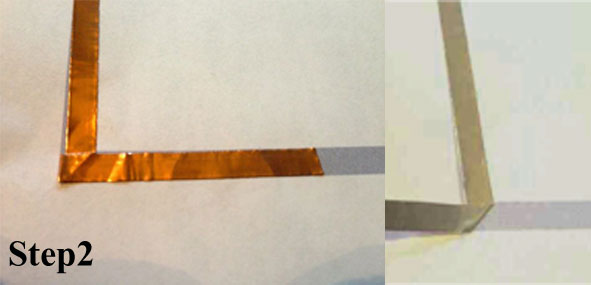
At the corner, fold the copper foil tape in opposite direction of turn. That is, if the circuit turn towards right, then fold the copper foil tape towards left and if the circuit towards left, then fold the copper paper foil towards right. Then fold the copper foil tape in the same direction of circuit.

The battery has two sides such as positive and negative. Place the battery at correct position. Take a binder clip and clip it to hold the battery at correct position.
Connect the LED in the circuit diagram.
A gap must provide in between the copper tape. If there is no gap, then the circuit will short circuit. So provide sufficient gap between tapes.
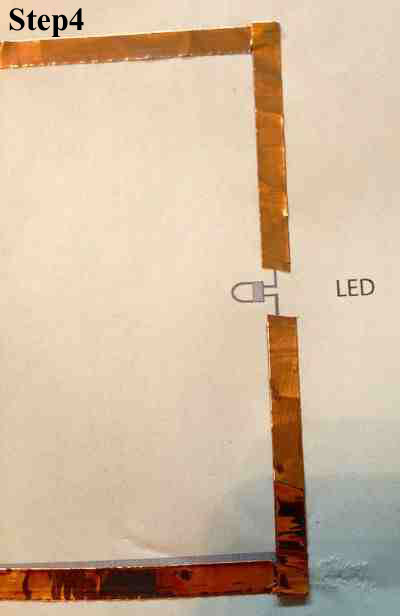
The LED (Light Emitting Diode) has two leads, one is longer and other is shorter. The longer one is positive lead and shorter one is negative lead. Bend these two leads sideways. Place the LED between the gaps. Fix the LED to the copper tape using a scotch tape over the LED. The two leads touch the copper tape, then the LED will glows. It is illustrated in the figure.
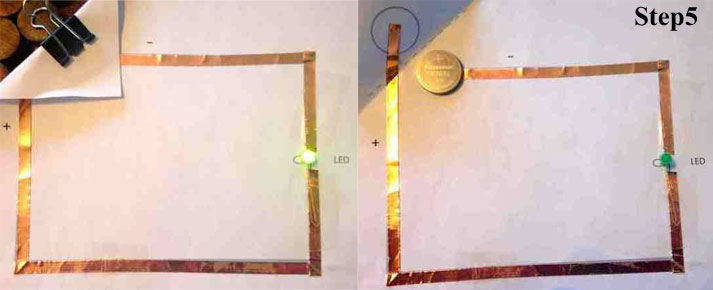
When the connections are made the LED glows.


Copyright © 2024 Mepits - Designed By Digiora


